Getting started with a VPS SSD 1 2016 from OVH
sam, 03/19/2016 - 17:39 — geek17![]()
In this article, we will see step by step how to start with a VPS SSD 1 from OVH.
For $3.49 / month, you have your own VPS server, based on OpenStack KVM with:
- 1 vCore at 2,4 GHz
- 2 Go RAM
- SSD 10 Go local Raid 10
Open a SSH connection on your VPS
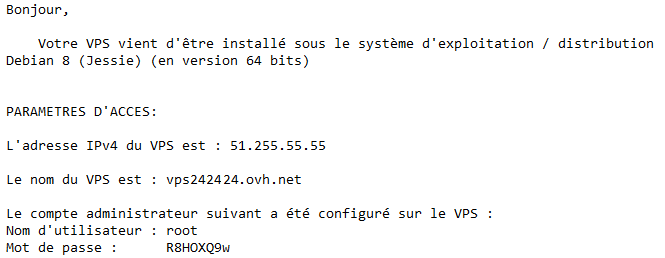
Few minutes after your payment, you will receive an email from OVH with the information on your VPS.
To open the SSH session on your VPS, you will need the Putty application which can be downloaded for free from ftp://ftp.chiark.greenend.org.uk/users/sgtatham/putty-latest/x86/putty.exe
Enter the IP address or the hostname vpsXXX.ovh.net of your VPS, then select SSH and click on the Open button.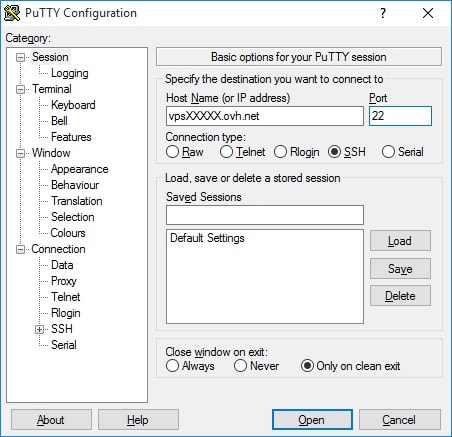
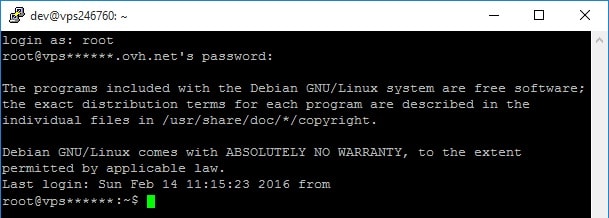
A console window appears, type root as user name and the associated password, received in the OVH activation email.
If you don't make any mistake, the SSH session is open on your server.
Updating the system
Once connected, and before going further, we start by updating our Debian version by typing the two commands below.
This updates the package list of Debian installation and installs the last new version of installed components.
apt-get update
apt-get upgrade
All packages of your system are now up to date.
Creation of a new user
We will now create a "standard" user that you will use daily instead of the root user.
Use the adduser command followed by the username you want to create, in my case dev
adduser devYou need to enter the password for this new user, and then you can record some optional information (or simply press Enter).
Adding user `dev' ...
Adding new group `dev' (1000) ...
Adding new user `dev' (1001) with group `dev' ...
Creating home directory `/home/dev' ...
Copying files from `/etc/skel' ...
Enter new UNIX password:
Retype new UNIX password:
passwd: password updated successfully
Changing the user information for dev
Enter the new value, or press ENTER for the default
        Full Name []: dev
        Room Number []:
        Work Phone []:
        Home Phone []:
        Other []:
Is the information correct? [Y/n] y
Like the previous Putty SSH session opened with root user, verify that your new user can be used to open a SSH session on your server too.
Change the root password
Now, we will change the default root password that you have received in the activation mail from OVH.
Use a complex password (avoid 123456, password ...), the whole security of your system will depend on if password.
Type the following command and confirm 2 times your new root password.
passwd
Improve SSH sessions security
For security reasons, it's strongly recommended to not allow the SSH connections with the root user.
This is the preferred user used by hackers trying to access your server.
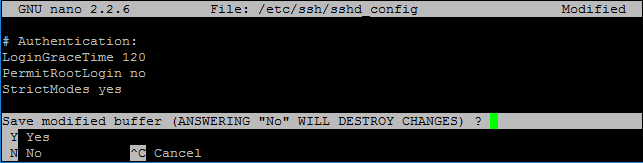
We will change the SSH configuration by opening the file /etc/ssh/sshd_config
nano /etc/ssh/sshd_configLook for the line beginning with PermitRootLogin, then change the value to no instead of yes.
PermitRootLogin noTo save your change in nano editor, type simultaneously on the Control and X keys of your keyboard.
Following the instruction at the bottom of your screen, answer Y and Enter to save changes.
Restart the SSH service to enable the change.
systemctl restart sshdSince now, you cannot anymore open a SSH session with Putty as root.
You must use the user created previously in this article.
I invite you to read my next article on the sudo command. This will allow you to use the root user, while being connected with your "standard" user.
Bonus: What is the processor of my VPS server
If you are curious like me  and you want to know on which type of processor is running your VPS server.
Run the following command:
cat /proc/cpuinfoIn my case, it's a Xeon E312xx (Sandy Bridge) at 2.4 GHz.
processor       : 0
vendor_id       : GenuineIntel
cpu family      : 6
model           : 42
model name      : Intel Xeon E312xx (Sandy Bridge)
stepping        : 1
microcode       : 0x1
cpu MHz         : 2394.442
cache size      : 4096 KB
physical id     : 0
siblings        : 1
core id         : 0
cpu cores       : 1
apicid          : 0
initial apicid  : 0
fpu             : yes
fpu_exception   : yes
cpuid level     : 13
wp              : yes
flags           : fpu vme de pse tsc msr pae mce cx8 apic sep mtrr pge mca cmov pat pse36 clflush mmx fxsr sse sse2 ss syscall nx pdpe1gb rdtscp lm constant_tsc rep_good nopl eagerfpu pni pclmulqdq vmx ssse3 fma cx16 pcid sse4_1 sse4_2 x2apic movbe popcnt tsc_deadline_timer aes xsave avx f16c rdrand hypervisor lahf_lm abm xsaveopt vnmi ept fsgsbase bmi1 avx2 smep bmi2 erms invpcid
bogomips        : 4788.88
clflush size    : 64
cache_alignment : 64
address sizes   : 40 bits physical, 48 bits virtual
power management: