Introduction
Create articles in plain text is fine... But it's far more powerful to use a toolbar like in Microsoft Word or LibreOffice to organise your text or add media (pictures, video...)
Your readers will enjoy the result because your articles will be more fun to read.
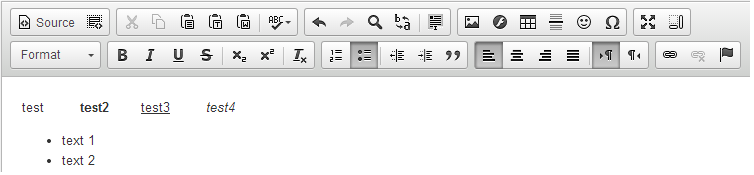
Below, you can see an example of toolbar, with a lot of options. If you follow this article, you can obtain the same one on your website  .
.
There are several module available for Drupal.
And I will present here the CKEditor module. I use this module because CKEditor will be included by default in the next Drupal 8. So, if you start to use it now, no change to expect when you will upgrade to Drupal 8.
Module installation
First, download the CKEditor Module at:https://www.drupal.org/project/ckeditor
Then unzip the contents of the archive in the modules folder of your Drupal website site\all\modules
And finally, activate the CKEditor module in Drupal administration page.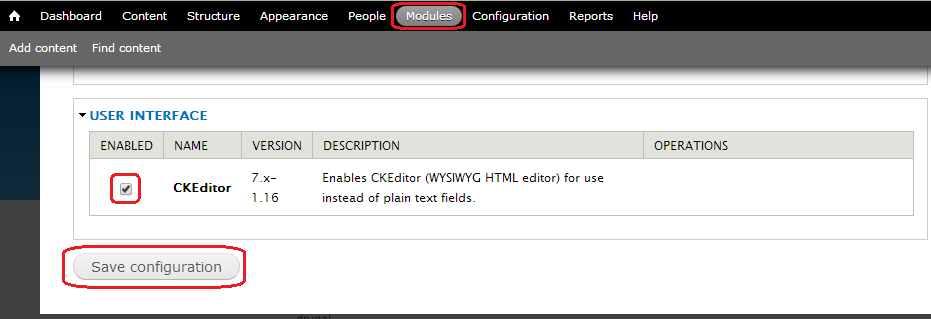
Configuration
A new option appears in the Configuration page, click CKEditor,
The administration page of CKEditor provides access to the configuration of 2 profiles created by default.
- "Advanced" profile corresponding to the filtered HTML, used by visitors to post comments, for example.
- "Full" profile is used by the administrator to add and edit articles, HTML is not filtered.
But, we will start to define global common settings of profiles.
CKEditor requires a Javascript library that contains a lot of files to work.
I recommend to use the library hosted directly on the CKEditor CDN servers, for the reasons explained by ckeditor:
- CKEditor is hosted on servers spread across the globe - scripts are loaded faster because they are served from the nearest locations to the end user
- If the same version of CKEditor has already been downloaded (even on a different website), it is loaded from cache
- CDN reduces the number of HTTP requests handled by your server so it speeds it up as well!
And I would like to add that CDN greatly facilitates the use of CKEditor plugins that are available by default 
You have to enter the address of the CKEditor library on CDN servers in the "Path to CKEditor" field in the "Advanced Settings" area.
This is a URL like //cdn.ckeditor.com/4.4.7/full-all (please use the latest version of CKEditor, this is 4.4.7 at the time of writing this article)
Back to CKEditor main configuration screen, click on the "Edit" link of the "Advanced" Profile.
Open the "Appearance Editor" part to configure your toolbar.
In this area, first select a model toolbar (Basic, Advanced or Full) and then add or remove icons from your toolbar to cover your needs.
You simply have to drag icons from available buttons to your toolbar.
For the "Advanced" profile of CKEditor, I recommend you to use a minimum of options.
HTML will be filtered before be posted and unauthorized HTML tags will not be displayed.
This "Advanced" profile is used by visitors to add comments on your articles and it is a safe way to filter text of visitors...
But for the "Full" CKEditor profile, you can enable as many options as you want.
The administrator will be able to create very nice articles with all the powerful of CKEditor (and HTML of course).
Don't forget to save your changes with the button at the bottom of the page.
How it works...
Open the window to add a new article, you will notice that the editor is available to create your article.
In my example below, it is the Basic version of CKEditor.
If you switch the "Text Format", under the article, to "Full HTML" (and if you have configured the associated CKEditor profile), you will see that the CKEditor toolbar is automatically updated with the options configured in the profile.
The CKEditor toolbar is also available in the comment form that your visitors will use to add comments on your articles.
For me, CKEditor is really a essential module. And that's why CKEditor will be integrated into the core of Drupal in the next version 8.
Add new comment